Recharging the AC system involves a detailed process, and understanding each step is crucial for optimal performance; that’s where MERCEDES-DIAGNOSTIC-TOOL.EDU.VN comes in, offering expert insights. Knowing the process ensures efficient cooling and extends the life of your AC components. Let’s dive into the detailed procedure, including best practices and safety measures, along with potential pitfalls to avoid, covering AC refill, AC recharge procedure, and refrigerant top-up.
Contents
1. What Do I Need to Recharge My Car’s AC?
To properly recharge your car’s AC, you’ll need a few essential items: an AC recharge kit that includes the correct refrigerant for your vehicle (either R-134a or R-1234yf), safety gloves and goggles, and a pressure gauge. Ensuring you have these tools and materials sets the stage for a successful AC recharge. Proper preparation can prevent accidents and ensure the job is done right.
Different vehicles require specific refrigerants, so always check your owner’s manual or the label under the hood to determine whether your car uses R-134a or R-1234yf. Using the wrong refrigerant can damage the AC system components, leading to costly repairs. It is also crucial to be completely informed about the instructions on the product you’ve chosen for a successful outcome.
To ensure your safety and the effectiveness of the recharging process:
- Work in a well-ventilated area or outdoors to avoid inhaling harmful vapors.
- Avoid skin contact with refrigerant, as it can cause frostbite due to its extremely low temperature.
- Do not overfill the system. Overcharging can damage AC components, reducing their lifespan and efficiency.
2. Step-by-Step Guide to Recharging Your AC
Recharging your car’s AC system involves several crucial steps, each designed to ensure optimal performance and safety. Proper execution of these steps guarantees that your AC operates efficiently, providing the cooling you need.
2.1 Determine Ambient Air Temperature
Before starting, it’s important to determine the ambient air temperature. If the temperature of the air is 55°F or below, do not charge the vehicle. Operating in these conditions can negatively impact the accuracy of the recharge.
It is always recommended to use a charging hose with a gauge. The refrigerant packaging should contain a chart like the one below for determining what pressure to charge the system, depending on the ambient air temperature. If no chart is provided, use the A/C pressure chart as a general guide. It’s also worth noting that different AC systems can have different recommended pressures, so it’s worth taking a look in a repair manual or online to determine the right pressure for your vehicle.
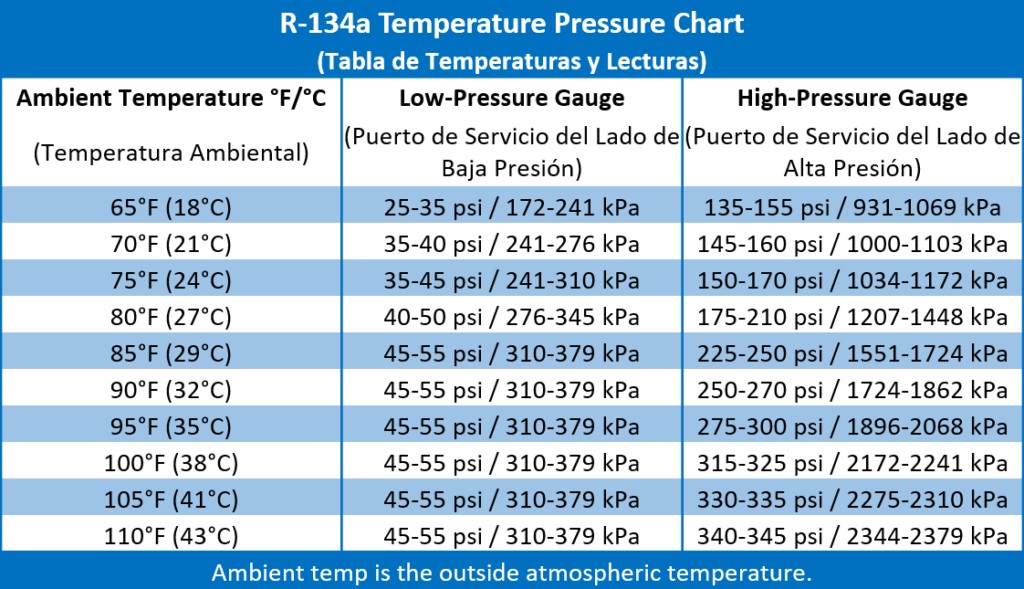 AC Temperature Pressure Chart for R-134a Recharging
Following these guidelines when recharging the system will ensure the system can operate efficiently. Charging an AC system with just a single gauge attached to the refrigerant is possible, but it is always recommended to use a complete set of manifold gauges, which monitor both the high and low side pressures. These gauges are available for sale, and for rent at most auto parts stores.
At this point, start the vehicle and set the air conditioning to MAX setting. Locate the vehicle’s AC compressor for reference, and it’s important to monitor what the AC clutch is doing. When the AC compressor is disengaged, only the outside of the pulley will turn. When it’s engaged, the entire clutch assembly will turn, driving the compressor. Your compressor is designed to not engage at all when refrigerant pressures or volume is too low.
2.2 Locate the Low-Pressure Port
Open the hood and locate the low-pressure service port on the AC system. This port is typically found on the line connecting the accumulator and compressor. The high side fitting is located between the AC compressor and condenser and is the larger of the two fittings. It is usually labeled with an “L” and found on the larger tubing near the compressor.
Consult the service manual to verify the exact location of the low-side service port. If hooking a can of refrigerant with a single hose/gauge to the car, you will use the low side. If hooking a set of gauges to the vehicle, you will use both.
Most 1994 and older vehicles used R12 as the original refrigerant. If the vehicle being serviced is still using R12, it must be evacuated and retrofitted. Mixing R12 and any other refrigerant is illegal. Never use the high-side port to add refrigerant; doing so is very dangerous and could cause harm. You will notice an R12-style fitting right away as the hose screws on to attach and has the look of a tire valve, while an R134A fitting is a larger quick-connect.
Starting in 2013, many vehicles began using 1234YF refrigerant. This refrigerant is NOT compatible with R134A and should be left to the professional to troubleshoot.
 A/C Pro R134a Synthetic Refrigerant
2.3 Wipe Away Dust
Wipe away any dust with a clean rag and then remove the cap from the low-side service port. Ensuring the area is clean prevents contaminants from entering the system, which could cause blockages or damage.
2.4 Connect the Recharge Kit Properly
Attach the hose from the recharge kit to the low-pressure port. Make sure the connection is secure before proceeding. A secure connection ensures that refrigerant flows properly without leaks, providing an accurate recharge.
2.5 Read the Pressure
Check the pressure reading on the gauge to determine if refrigerant is needed. If the gauge shows the refrigerant is within normal levels, there’s likely a different repair that’s required instead of a simple recharge. This step helps avoid unnecessary recharging, which can lead to overfilling and potential damage.
2.6 Add Refrigerant Safely
Place your thermometer in the dash vent for monitoring. Start the car and turn the AC to the maximum cold setting with the fan at full speed. Squeeze the trigger on the recharge kit to slowly add refrigerant in short bursts while monitoring the gauge. You should notice that as the low-side pressure reaches approximately 25-30 PSI, the compressor clutch will engage. Stop once the pressure reaches the recommended level and the air blowing from the vents is cold. When it’s around 70 to 80 Fahrenheit outside, the vent temperature should be around 35 to 48 degrees.
 A/C Avalanche R134a Refrigerant
2.7 Remove the Charging Hose
After the air conditioning system is charged to the proper pressure, remove the charging hose from the low-side service port (or gauges), leaving the can attached to the charge hose, and store any additional refrigerant in a dry, cool spot. Proper storage ensures the refrigerant remains usable for future top-ups if needed.
2.8 Check the Service Port Cap Seal Before Reinstalling
Ensure that the seal beneath the cap does not have any cracks, nicks, or tears. This seal can provide added protection if the Schrader valve ever forms a leak. A good seal prevents refrigerant from leaking out, maintaining the system’s pressure and efficiency.
3. What Are Common Mistakes to Avoid When Recharging AC
Like many car repairs, an easy refrigerant recharge can go wrong, which is why following the instructions to the letter is imperative. To ensure a successful recharge, it’s critical to avoid common pitfalls.
- Adding too much refrigerant can cause excessive pressure buildup, leading to compressor damage and reduced cooling efficiency.
- Recharging won’t fix a refrigerant leak. If your AC stops blowing cold air again shortly after a recharge, check for leaks and repair them before adding more refrigerant.
- Each vehicle has specific refrigerant requirements. Always follow the recommended guidelines to prevent damage to the AC system.
4. What is AC Pressure Chart?
An AC pressure chart is a reference guide that provides the ideal pressure ranges for your car’s AC system, depending on the ambient temperature. Using this chart, you can accurately assess whether your AC system has the correct amount of refrigerant, ensuring optimal cooling performance. A pressure chart helps prevent undercharging or overcharging, both of which can damage the system.
4.1 Why Use an AC Pressure Chart?
Using an AC pressure chart helps prevent potential issues like compressor damage or reduced cooling efficiency. This chart allows you to maintain the correct refrigerant levels for efficient AC operation, ensuring your vehicle’s climate control system works as intended.
5. How to Use UV Light and Dye to Find Leaks
After recharging your air conditioning, the difference should be noticeable immediately. It may be worth checking the pressure once or twice after recharging in case the low refrigerant level was caused by a leak in the system. If you believe there is a leak, get a UV light and some UV dye so you can find the leak. The UV dye will make the hole visible when the UV light is shined onto the A/C components.
5.1 What You’ll Need
- UV Light: A specialized flashlight that emits ultraviolet light.
- UV Dye: A fluorescent dye designed to be added to the refrigerant.
- Safety Goggles: To protect your eyes from UV light and potential splashes.
- Gloves: To keep your hands clean and protected.
5.2 Steps to Locate the Leak
- Add UV Dye: With the AC system running, add the UV dye to the system via the low-pressure service port. Follow the dye manufacturer’s instructions for the correct amount to add.
- Run the AC: Allow the AC system to run for about 15-20 minutes. This circulates the dye throughout the system.
- Inspect with UV Light: In a darkened environment, shine the UV light on all AC components, including hoses, fittings, the compressor, and the condenser.
- Identify the Leak: The dye will glow brightly under the UV light at the location of the leak. Mark the spot for repair.
5.3 Safety Tips
- Eye Protection: Always wear safety goggles when working with UV light and dye.
- Ventilation: Work in a well-ventilated area.
- Skin Protection: Wear gloves to avoid skin contact with the dye.
6. When to Seek Professional AC Service
If your AC doesn’t improve after a recharge, there may be a deeper issue, such as a clogged expansion valve or a failing compressor. Or, if refrigerant levels drop quickly after a recharge, a major leak is likely. A faulty compressor can prevent the AC from cooling properly. If the compressor isn’t engaging when you turn on the AC, professional inspection is recommended. Professional diagnosis and a subsequent repair are necessary before recharging again.
6.1 What are the benefits of Professional AC Service?
Professional AC service provides several key benefits, including:
- Accurate Diagnosis: Professionals can accurately diagnose complex AC issues.
- Specialized Tools: They have access to specialized tools for AC repair.
- Proper Refrigerant Handling: Professionals handle refrigerant safely and legally.
- Comprehensive Repairs: They can perform comprehensive repairs beyond simple recharges.
6.2 What Happens During a Professional AC Service?
- System Evaluation: Technicians evaluate the entire AC system.
- Leak Detection: They use advanced tools to detect refrigerant leaks.
- Component Inspection: They inspect the compressor, condenser, and other components.
- Performance Testing: They test the AC system’s performance after repairs.
7. Which Refrigerant Should I Use?
Choosing the correct refrigerant is vital for the efficiency and longevity of your car’s AC system. The two main types of refrigerants used in vehicles are R-134a and R-1234yf. The refrigerant your car needs depends on its model year and the manufacturer’s specifications.
7.1 R-134a
R-134a has been widely used in vehicles for many years. It’s a hydrofluorocarbon (HFC) refrigerant known for its efficiency and affordability. If your vehicle was manufactured before 2017, it likely uses R-134a.
7.2 R-1234yf
R-1234yf is a newer refrigerant designed to replace R-134a due to its lower global warming potential (GWP). Introduced in 2013, it’s now standard in many newer vehicles. R-1234yf is more environmentally friendly but also more expensive.
7.3 How to Determine the Correct Refrigerant
To determine the correct refrigerant for your vehicle, check the following:
- Owner’s Manual: Refer to your vehicle’s owner’s manual for specific refrigerant requirements.
- Under the Hood: Look for a sticker under the hood near the AC compressor or on the engine bay that specifies the type of refrigerant.
- Service Port Fittings: Examine the service port fittings. R-134a and R-1234yf fittings are different sizes to prevent cross-contamination.
Using the wrong refrigerant can cause serious damage to your AC system. Mixing refrigerants can lead to reduced performance, compressor failure, and costly repairs. Always use the refrigerant specified by your vehicle manufacturer.
8. What are the Key Components of a Car AC System?
Understanding the components of your car’s AC system is essential for proper maintenance and troubleshooting. The main parts include the compressor, condenser, expansion valve, evaporator, and refrigerant. Each component plays a critical role in the cooling process.
- Compressor: Compresses the refrigerant and circulates it through the system.
- Condenser: Dissipates heat from the refrigerant.
- Expansion Valve: Regulates the flow of refrigerant into the evaporator.
- Evaporator: Absorbs heat from the cabin air, cooling the interior.
- Refrigerant: The cooling agent that absorbs and transfers heat.
9. What are the Signs Your Car AC Needs To Be Recharged?
Recognizing the signs that your car AC needs recharging can prevent further damage and maintain optimal cooling performance. Common indicators include weak airflow, warm air blowing from the vents, and unusual noises.
9.1 Weak Airflow
If the airflow from your AC vents is significantly weaker than usual, it may indicate low refrigerant levels. A reduced amount of refrigerant means the system can’t circulate air effectively, leading to decreased airflow.
9.2 Warm Air Blowing from Vents
One of the most obvious signs is when the AC blows warm or lukewarm air instead of cold air. This typically means the refrigerant is low, and the system cannot cool the air properly.
9.3 Unusual Noises
Strange noises coming from the AC system, such as hissing or gurgling sounds, can indicate low refrigerant or a leak. These noises occur as the system struggles to maintain pressure and circulate refrigerant.
9.4 AC Not Engaging
If the AC compressor is not engaging when you turn on the AC, it could be due to low refrigerant levels. Many vehicles have a safety mechanism that prevents the compressor from running when refrigerant is too low to prevent damage.
9.5 Visible Leaks
Inspect the AC components for visible signs of leaks, such as oily residue or refrigerant accumulation. Leaks can cause a gradual loss of refrigerant, leading to poor cooling performance.
10. What Happens If I Overcharge My Car’s AC System?
Overcharging your car’s AC system can lead to serious damage. Excessive pressure inside the system can strain and potentially damage the compressor, hoses, and other components. Overcharging can also reduce the cooling efficiency of the AC.
10.1 Potential Damage
- Compressor Damage: The compressor is the most vulnerable component. Overcharging increases the workload, leading to premature wear and potential failure.
- Hose Damage: Excessive pressure can cause hoses to rupture or leak.
- Reduced Efficiency: Overcharging can cause the system to work harder, reducing its ability to cool the air effectively.
10.2 How to Avoid Overcharging
- Use a Gauge: Always use a pressure gauge when recharging the AC to ensure the correct amount of refrigerant is added.
- Follow Instructions: Carefully follow the instructions provided with the recharge kit and your vehicle’s service manual.
- Add Slowly: Add refrigerant in small bursts, checking the pressure after each addition.
11. How Do I Know If My AC System Has a Refrigerant Leak?
Identifying a refrigerant leak early can prevent further damage to your AC system. Common signs include a sudden loss of cooling performance, hissing noises, and visible refrigerant residue.
11.1 Signs of a Refrigerant Leak
- Sudden Loss of Cooling: A rapid decrease in cooling performance is a primary indicator of a leak.
- Hissing Noises: Hissing sounds near AC components can indicate refrigerant escaping.
- Visible Residue: Oily or wet residue around hoses and fittings can be a sign of a leak.
11.2 Detecting Leaks
- Visual Inspection: Check all AC components for signs of leaks.
- UV Dye Method: Use UV dye and a UV light to locate leaks.
- Electronic Leak Detector: Use an electronic leak detector to pinpoint the location of leaks.
12. Can I Recharge My Car’s AC Without a Gauge?
Recharging your car’s AC without a gauge is not recommended. A pressure gauge is essential for monitoring the refrigerant levels and preventing overcharging or undercharging. Without a gauge, it’s difficult to know the correct amount of refrigerant to add.
12.1 Risks of Recharging Without a Gauge
- Overcharging: Adding too much refrigerant can damage the compressor and other components.
- Undercharging: Not adding enough refrigerant can result in poor cooling performance.
- Inaccurate Readings: Without a gauge, you cannot accurately monitor the system’s pressure, leading to potential issues.
13. Why is My AC Still Blowing Warm Air After Recharging?
If your AC continues to blow warm air after recharging, there could be several underlying issues. Common causes include a refrigerant leak, a failing compressor, or clogged AC components.
13.1 Common Causes
- Refrigerant Leak: A leak can cause the refrigerant to escape, resulting in poor cooling performance.
- Failing Compressor: A faulty compressor may not be able to circulate refrigerant properly.
- Clogged Components: A clogged expansion valve or condenser can restrict refrigerant flow.
13.2 Troubleshooting Steps
- Check for Leaks: Inspect all AC components for signs of leaks.
- Evaluate Compressor: Ensure the compressor is engaging and functioning correctly.
- Inspect Components: Check the expansion valve and condenser for clogs or damage.
Recharging your car’s AC system can often be a straightforward process when you follow the right steps and take the necessary precautions. However, if you encounter persistent issues or are unsure about any part of the process, it’s best to consult with a professional. Proper maintenance and timely repairs will keep your AC system running efficiently, providing you with the comfort you need on the road.
For expert guidance and comprehensive solutions for your Mercedes-Benz AC system, contact us at MERCEDES-DIAGNOSTIC-TOOL.EDU.VN. Our team is ready to assist you with accurate diagnoses, professional services, and reliable support to keep your vehicle running smoothly. Reach out today to schedule a consultation and experience the difference our expertise can make.
For professional advice and top-notch AC services for your Mercedes-Benz, contact MERCEDES-DIAGNOSTIC-TOOL.EDU.VN at 789 Oak Avenue, Miami, FL 33101, United States. Call us on Whatsapp at +1 (641) 206-8880 or visit our website at MERCEDES-DIAGNOSTIC-TOOL.EDU.VN for more information. Let us help you keep your ride cool and comfortable!
FAQ/People Also Ask
1. How Often Should I Recharge My Car’s AC?
Most vehicles do not require frequent recharging unless there is a leak. If cooling performance deteriorates, it’s time to check refrigerant levels. Regular checks can help identify issues early.
2. What Happens If I Overcharge My Car’s AC System?
Overcharging can lead to excessive pressure inside, potentially damaging the compressor and other components. Always use a pressure gauge to prevent overcharging.
3. How Do I Know If My AC System Has a Refrigerant Leak?
A sudden loss of cooling performance, hissing noises, or visible refrigerant residue near AC components can indicate a leak. Inspect your system regularly for these signs.
4. Can I Recharge My Car’s AC Without a Gauge?
It’s not recommended. A pressure gauge ensures the correct amount of refrigerant is added and prevents overcharging. Using a gauge provides accurate readings and avoids potential damage.
5. Why is My AC Still Blowing Warm Air After Recharging?
A persistent warm airflow after recharging could be due to a refrigerant leak, a failing compressor, or clogged AC components. Professional diagnosis is recommended for persistent issues.