Replacing license plate light bulbs or units involves a few straightforward steps, and MERCEDES-DIAGNOSTIC-TOOL.EDU.VN can help you navigate this process with ease and precision. This guide will provide you with the necessary insights and solutions to ensure your Mercedes-Benz maintains optimal functionality and appearance, focusing on automotive lighting, vehicle maintenance, and DIY car repairs.
1. Understanding the Importance of License Plate Lights
License plate lights are essential components of your vehicle’s lighting system. They ensure your license plate is visible at night or in low-light conditions, which is a legal requirement in most jurisdictions. Failing to have functional license plate lights can result in fines or other legal issues.
1.1. Legal Compliance
Operating a vehicle with a non-functional license plate light is a violation of traffic laws. According to the National Highway Traffic Safety Administration (NHTSA), all vehicles must have functioning license plate lights to ensure law enforcement and other drivers can easily identify the vehicle. Regular checks and prompt replacements are crucial for compliance.
1.2. Safety Considerations
Beyond legal requirements, license plate lights contribute to overall vehicle safety. A well-lit license plate enhances visibility, reducing the risk of accidents by making your vehicle more identifiable to other drivers and pedestrians, especially in poor lighting conditions.
2. Identifying the Need for Replacement
Several signs indicate that your license plate light bulb or unit needs replacement. Regular inspection can help you identify these issues early, preventing potential legal and safety concerns.
2.1. Dim or Flickering Lights
One of the first signs of a failing license plate light is a noticeable dimming or flickering. This usually indicates that the bulb is nearing the end of its lifespan and needs to be replaced. Ignoring this can lead to complete failure of the light.
2.2. Complete Light Failure
The most obvious sign is when the license plate light completely stops working. This could be due to a blown bulb, a faulty wiring connection, or a problem with the light unit itself. Immediate replacement is necessary to maintain legal compliance and safety.
2.3. Physical Damage
Inspect the license plate light unit for any signs of physical damage, such as cracks or breaks. Damage can compromise the light’s functionality and expose the bulb and wiring to moisture and other elements, leading to corrosion and failure.
3. Essential Tools and Materials
Before you begin the replacement process, gather the necessary tools and materials. Having everything on hand will make the task smoother and more efficient.
3.1. Replacement Bulbs or Units
Ensure you have the correct replacement bulbs or units for your Mercedes-Benz model. Consult your vehicle’s manual or MERCEDES-DIAGNOSTIC-TOOL.EDU.VN for the correct specifications. Using the wrong type of bulb can lead to poor performance or damage to the electrical system.
3.2. Screwdrivers
A set of screwdrivers, including both flathead and Phillips head, may be needed to remove the license plate light unit from the vehicle. The specific type and size of screwdriver will depend on the design of your Mercedes-Benz model.
3.3. Socket Set
In some cases, a socket set may be required to remove the license plate light unit, especially if it is secured with bolts rather than screws. Check your vehicle’s manual for the correct socket size.
3.4. Pliers
Pliers can be useful for gripping and manipulating small parts, such as bulb holders or wiring connectors. Needle-nose pliers are particularly helpful for accessing tight spaces.
3.5. Protective Gloves
Wearing protective gloves will keep your hands clean and protect them from sharp edges or hot surfaces. This is especially important when working with electrical components.
3.6. Safety Glasses
Safety glasses are essential to protect your eyes from debris or accidental damage during the replacement process.
4. Step-by-Step Guide to Replacing License Plate Light Bulbs or Units
Follow these detailed steps to safely and effectively replace your license plate light bulbs or units.
4.1. Step 1: Turn Off the Vehicle and Engage the Parking Brake
Before starting any electrical work on your vehicle, turn off the engine and engage the parking brake. This will prevent accidental movement of the vehicle and minimize the risk of electrical shock.
4.2. Step 2: Locate the License Plate Light Units
The license plate light units are typically located above or to the sides of the license plate on the rear of the vehicle. Refer to your vehicle’s manual if you are unsure of their exact location.
4.3. Step 3: Remove the Light Unit Cover or Housing
Depending on the design of your Mercedes-Benz, the license plate light unit may be covered by a plastic lens or housing. Use a screwdriver or socket set to carefully remove the cover. Some covers may simply snap off, while others may be held in place by screws or bolts.
4.4. Step 4: Access the Bulb
Once the cover is removed, you should have access to the bulb. The bulb may be held in place by a socket or a clip. Gently twist the socket or release the clip to remove the bulb from the light unit.
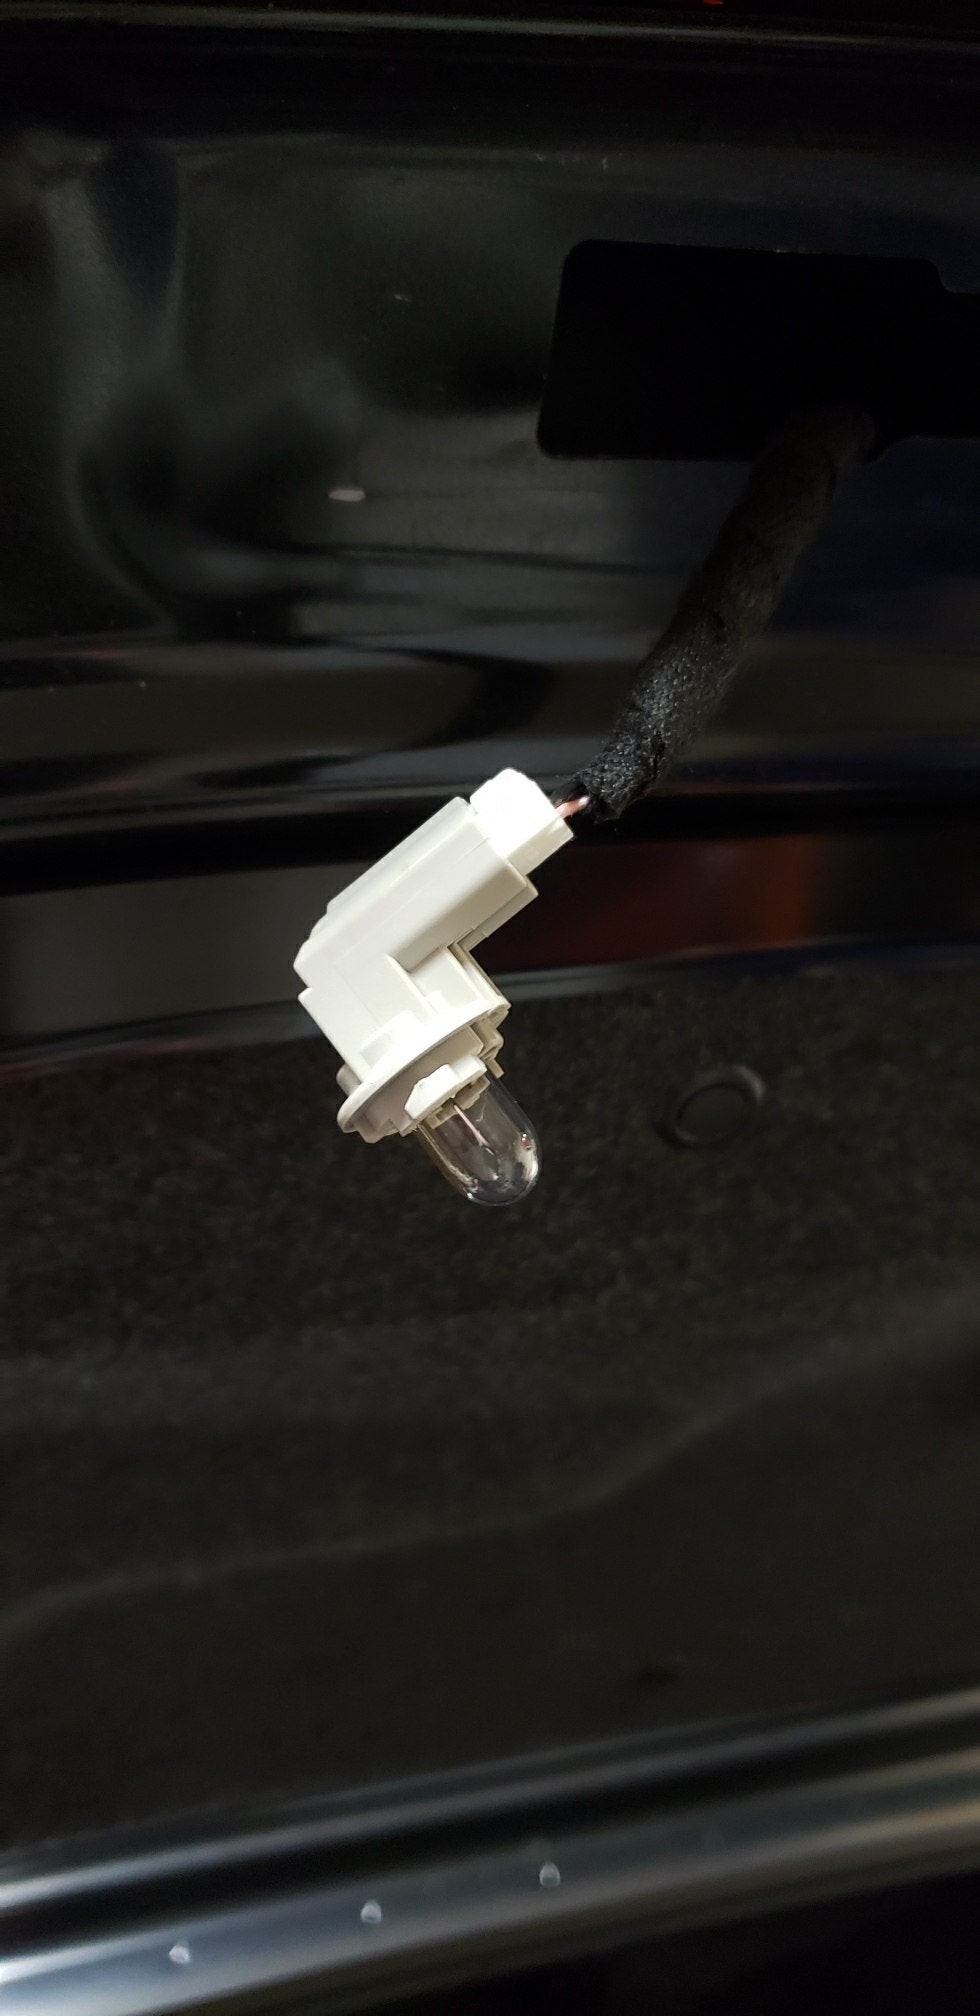 Accessing the Bulb
4.5. Step 5: Remove the Old Bulb
Carefully remove the old bulb from the socket. If the bulb is broken, use pliers to grip the base and pull it out. Be sure to wear gloves to protect your hands from sharp glass.
4.6. Step 6: Install the New Bulb
Insert the new bulb into the socket, making sure it is securely in place. If the bulb has a specific orientation, ensure it is installed correctly.
4.7. Step 7: Test the New Bulb
Before reassembling the light unit, turn on the vehicle’s lights to test the new bulb. If the bulb does not light up, double-check the connection and ensure the bulb is properly seated in the socket.
4.8. Step 8: Reassemble the Light Unit
Once you have confirmed that the new bulb is working, reassemble the light unit by replacing the cover or housing. Secure it with screws or bolts, if necessary.
4.9. Step 9: Repeat for the Other Light Unit
Repeat the process for the other license plate light unit, if applicable. Ensure that both lights are working correctly before completing the task.
4.10. Step 10: Final Check
Perform a final check to ensure that both license plate lights are functioning properly and that all covers and housings are securely in place.
5. Replacing the Entire License Plate Light Unit
In some cases, it may be necessary to replace the entire license plate light unit rather than just the bulb. This is often required if the unit is damaged or corroded beyond repair.
5.1. Disconnecting the Wiring
Before removing the old light unit, disconnect the wiring connector that supplies power to the unit. This connector is typically located on the back of the unit and may be secured with a clip or a locking mechanism.
5.2. Removing the Old Unit
Use a screwdriver or socket set to remove the screws or bolts that hold the old light unit in place. Carefully detach the unit from the vehicle, making sure not to damage the surrounding bodywork.
5.3. Installing the New Unit
Attach the new light unit to the vehicle, aligning it with the mounting holes. Secure it with screws or bolts, tightening them to the manufacturer’s specified torque.
5.4. Connecting the Wiring
Connect the wiring connector to the new light unit, making sure it is securely in place. If the connector has a locking mechanism, ensure it is properly engaged.
5.5. Testing the New Unit
Turn on the vehicle’s lights to test the new light unit. If the unit does not light up, double-check the wiring connection and ensure the unit is properly grounded.
6. Common Issues and Troubleshooting
Even with careful attention to detail, you may encounter issues during the replacement process. Here are some common problems and how to troubleshoot them.
6.1. Bulb Not Lighting Up
If the new bulb does not light up, check the following:
- Bulb Compatibility: Ensure the bulb is the correct type and voltage for your vehicle.
- Socket Connection: Make sure the bulb is securely seated in the socket and that the contacts are clean and making good contact.
- Wiring Connection: Check the wiring connector to ensure it is properly connected and that there are no damaged wires.
- Fuse: Inspect the fuse that controls the license plate lights. A blown fuse can prevent the lights from working.
6.2. Light Flickering
Flickering lights can be caused by a loose connection or a faulty bulb. Check the following:
- Bulb Socket: Ensure the bulb is securely seated in the socket and that the contacts are clean.
- Wiring Connections: Inspect the wiring connections for any loose or corroded terminals.
- Voltage Fluctuations: Use a multimeter to check the voltage at the light unit. Fluctuations in voltage can cause the lights to flicker.
6.3. Light Unit Not Fitting Properly
If the new light unit does not fit properly, ensure that it is the correct part for your vehicle. Check the following:
- Part Number: Verify that the part number on the new light unit matches the part number specified in your vehicle’s manual.
- Mounting Holes: Ensure that the mounting holes on the new light unit align with the mounting holes on the vehicle.
- Connector Compatibility: Check that the wiring connector on the new light unit is compatible with the wiring connector on the vehicle.
7. Upgrading to LED License Plate Lights
Many Mercedes-Benz owners choose to upgrade their license plate lights to LED (light-emitting diode) bulbs or units. LED lights offer several advantages over traditional incandescent bulbs, including longer lifespan, lower power consumption, and brighter light output.
7.1. Benefits of LED Lights
- Longer Lifespan: LED bulbs typically last much longer than incandescent bulbs, reducing the need for frequent replacements.
- Lower Power Consumption: LED bulbs consume less power, which can help to reduce the load on your vehicle’s electrical system.
- Brighter Light Output: LED bulbs produce a brighter, more focused light, which can improve visibility and safety.
- Modern Look: LED lights can give your vehicle a more modern and stylish appearance.
7.2. Installation Considerations
When upgrading to LED license plate lights, keep the following in mind:
- Compatibility: Ensure that the LED bulbs or units are compatible with your Mercedes-Benz model.
- Polarity: Some LED bulbs have a specific polarity, meaning they must be installed in the correct orientation to work.
- Error Codes: Some vehicles may display error codes when LED bulbs are installed due to their lower power consumption. This can be resolved by installing resistors in parallel with the LED bulbs.
8. Maintaining Your License Plate Lights
Regular maintenance can help to prolong the lifespan of your license plate lights and ensure they continue to function properly.
8.1. Regular Inspections
Inspect your license plate lights regularly to check for any signs of damage or wear. Look for dimming, flickering, or complete failure of the lights.
8.2. Cleaning
Keep the license plate light covers clean to ensure optimal light output. Use a mild soap and water solution to remove dirt and grime.
8.3. Protecting from Moisture
Protect the license plate light units from moisture and corrosion. Apply a dielectric grease to the wiring connectors to prevent corrosion and ensure a good electrical connection.
9. When to Seek Professional Help
While replacing license plate light bulbs or units is a relatively simple task, there are situations where it is best to seek professional help.
9.1. Electrical Issues
If you suspect an electrical issue, such as a short circuit or a faulty wiring harness, it is best to consult a qualified mechanic or electrician. Attempting to diagnose and repair complex electrical problems without the proper knowledge and tools can be dangerous.
9.2. Complex Installations
If the replacement process involves complex installations or modifications to the vehicle’s electrical system, it is best to seek professional help. This is especially true if you are not comfortable working with electrical components.
9.3. Warranty Concerns
If your vehicle is still under warranty, consult your dealer before making any modifications or repairs. Unauthorized modifications or repairs can void your warranty.
10. Choosing the Right Replacement Parts
Selecting the correct replacement parts is crucial for ensuring the proper functioning and longevity of your license plate lights.
10.1. OEM vs. Aftermarket Parts
- OEM (Original Equipment Manufacturer) Parts: These parts are made by the same manufacturer that made the original parts for your vehicle. OEM parts are typically more expensive but offer the best fit and performance.
- Aftermarket Parts: These parts are made by third-party manufacturers. Aftermarket parts can be less expensive than OEM parts but may not offer the same level of quality or performance.
10.2. Quality Considerations
When choosing replacement parts, prioritize quality over price. Look for parts that are made from durable materials and have a good reputation for reliability. Reading reviews and seeking recommendations from other Mercedes-Benz owners can help you make an informed decision.
11. Ensuring Proper Fitment
Proper fitment is essential for ensuring that the license plate light units function correctly and are securely attached to the vehicle.
11.1. Verifying Part Numbers
Before purchasing replacement parts, verify that the part numbers match the part numbers specified in your vehicle’s manual. This will help to ensure that the parts are the correct size and shape for your vehicle.
11.2. Checking Dimensions
Compare the dimensions of the new light unit to the dimensions of the old light unit. Ensure that the new unit is the same size and shape as the old unit.
11.3. Testing the Fit
Before securing the new light unit to the vehicle, test the fit by aligning it with the mounting holes and checking for any gaps or misalignments. If the unit does not fit properly, return it to the seller and obtain a replacement.
12. Advanced Troubleshooting Techniques
For more complex issues, advanced troubleshooting techniques may be required to diagnose and resolve the problem.
12.1. Using a Multimeter
A multimeter is a versatile tool that can be used to measure voltage, current, and resistance in electrical circuits. Use a multimeter to check the voltage at the license plate light unit and to test the continuity of the wiring.
12.2. Checking for Short Circuits
A short circuit occurs when there is an unintended electrical connection between two points in a circuit. Use a multimeter to check for short circuits in the wiring and to identify the source of the problem.
12.3. Diagnosing Grounding Issues
A grounding issue occurs when there is a poor electrical connection between a component and the vehicle’s chassis. Use a multimeter to check the grounding connections and to ensure that they are clean and secure.
13. Safety Precautions
When working on your vehicle’s electrical system, it is important to take certain safety precautions to prevent injury or damage.
13.1. Disconnecting the Battery
Before working on any electrical components, disconnect the negative terminal of the battery. This will prevent accidental electrical shocks and minimize the risk of damaging the vehicle’s electrical system.
13.2. Wearing Protective Gear
Wear protective gloves and safety glasses to protect your hands and eyes from sharp edges, hot surfaces, and electrical hazards.
13.3. Working in a Well-Ventilated Area
Work in a well-ventilated area to avoid inhaling harmful fumes or vapors.
14. Benefits of Using MERCEDES-DIAGNOSTIC-TOOL.EDU.VN
MERCEDES-DIAGNOSTIC-TOOL.EDU.VN offers numerous benefits for Mercedes-Benz owners looking to maintain and repair their vehicles.
14.1. Access to Diagnostic Tools
We provide detailed information about various diagnostic tools suitable for Mercedes-Benz vehicles. Understanding the right tool can save time and money by accurately identifying issues.
14.2. Step-by-Step Guides
Our step-by-step guides make complex repairs manageable for DIY enthusiasts. Clear instructions and visual aids ensure you can confidently tackle tasks like replacing license plate lights.
14.3. Expert Advice
Gain access to expert advice and troubleshooting tips to resolve common issues. Our team of experienced technicians is here to support you through every step of your repair journey.
14.4. Cost Savings
By providing the knowledge and resources to perform repairs yourself, MERCEDES-DIAGNOSTIC-TOOL.EDU.VN helps you save on expensive dealership service costs.
15. Enhancing Vehicle Aesthetics with License Plate Lights
Beyond functionality, license plate lights contribute to the overall aesthetics of your Mercedes-Benz.
15.1. Choosing the Right Style
Select license plate lights that complement the style of your vehicle. LED lights offer a modern, sleek appearance, while traditional bulbs provide a classic look.
15.2. Customization Options
Explore customization options, such as colored lenses or unique light patterns, to personalize your vehicle’s appearance.
15.3. Maintaining a Clean Look
Keep your license plate lights clean and free from damage to maintain a polished and professional look.
16. Ensuring Longevity of Your Vehicle’s Lighting System
Proper maintenance and care can extend the lifespan of your vehicle’s entire lighting system, including the license plate lights.
16.1. Regular Cleaning
Clean all exterior lights regularly to remove dirt, grime, and debris that can reduce light output.
16.2. Checking for Damage
Inspect your lights for any signs of cracks, chips, or other damage that could compromise their functionality.
16.3. Protecting from the Elements
Protect your lights from harsh weather conditions, such as extreme heat or cold, which can cause damage and reduce their lifespan.
17. Connecting with MERCEDES-DIAGNOSTIC-TOOL.EDU.VN
Stay connected with MERCEDES-DIAGNOSTIC-TOOL.EDU.VN for the latest updates, tips, and resources for maintaining your Mercedes-Benz.
17.1. Website Resources
Visit our website at MERCEDES-DIAGNOSTIC-TOOL.EDU.VN for a wealth of information, including diagnostic tool reviews, step-by-step repair guides, and expert advice.
17.2. Contact Information
For personalized assistance, contact us at:
- Address: 789 Oak Avenue, Miami, FL 33101, United States
- WhatsApp: +1 (641) 206-8880
18. Understanding Different Types of License Plate Lights
There are several types of license plate lights available, each with its own advantages and disadvantages.
18.1. Incandescent Bulbs
Incandescent bulbs are the traditional type of license plate light. They are inexpensive and readily available, but they have a shorter lifespan and consume more power than other types of bulbs.
18.2. Halogen Bulbs
Halogen bulbs are similar to incandescent bulbs, but they contain a halogen gas that increases their light output and lifespan. They are more expensive than incandescent bulbs but offer better performance.
18.3. LED Bulbs
LED bulbs are the most advanced type of license plate light. They have a very long lifespan, consume very little power, and produce a bright, focused light. They are more expensive than incandescent and halogen bulbs, but their benefits make them a worthwhile investment.
18.4. Complete LED Units
Complete LED units replace the entire license plate light assembly with an LED unit. These units often offer a more integrated and stylish look, and they can be easier to install than individual LED bulbs.
19. Additional Tips for License Plate Light Replacement
Here are some additional tips to keep in mind when replacing your license plate lights:
19.1. Use the Right Tools
Using the right tools can make the replacement process much easier and prevent damage to your vehicle. Invest in a good set of screwdrivers, pliers, and sockets.
19.2. Be Gentle
Be gentle when removing and installing the light units and bulbs. Avoid using excessive force, which can damage the components.
19.3. Take Your Time
Take your time and follow the instructions carefully. Rushing through the process can lead to mistakes and potential damage.
19.4. Test Before Reassembling
Always test the new lights before reassembling the light units. This will save you time and effort if there is a problem.
20. Environmental Considerations
When replacing your license plate lights, it is important to consider the environmental impact of your actions.
20.1. Recycling Old Bulbs
Recycle your old bulbs properly. Incandescent and halogen bulbs contain materials that can be harmful to the environment if they are not disposed of correctly.
20.2. Choosing Energy-Efficient Bulbs
Choose energy-efficient LED bulbs to reduce your vehicle’s carbon footprint. LED bulbs consume significantly less power than incandescent and halogen bulbs, which can help to reduce your vehicle’s fuel consumption and emissions.
21. Understanding the Role of Fuses
Fuses play a critical role in protecting your vehicle’s electrical system, including the license plate lights.
21.1. Locating the Fuse Box
The fuse box is typically located under the dashboard or in the engine compartment. Consult your vehicle’s manual to locate the fuse box and identify the fuse that controls the license plate lights.
21.2. Identifying a Blown Fuse
A blown fuse will have a broken filament or a dark, burnt appearance. Use a fuse tester or a multimeter to check the continuity of the fuse.
21.3. Replacing a Blown Fuse
Replace a blown fuse with a new fuse of the same amperage rating. Using a fuse with a higher amperage rating can damage the electrical system.
22. Addressing Common Misconceptions
There are several common misconceptions about license plate lights that can lead to confusion and improper maintenance.
22.1. “License Plate Lights Are Not Important”
This is a dangerous misconception. License plate lights are essential for legal compliance and safety. Operating a vehicle with non-functional license plate lights can result in fines and increase the risk of accidents.
22.2. “Any Bulb Will Work”
Using the wrong type of bulb can lead to poor performance, damage to the electrical system, and even fire. Always use the correct type of bulb for your vehicle.
22.3. “LEDs Are Too Expensive”
While LED bulbs may be more expensive upfront, their longer lifespan and lower power consumption make them a cost-effective choice in the long run.
23. Staying Updated with Automotive Lighting Technology
The field of automotive lighting is constantly evolving, with new technologies and innovations being introduced regularly.
23.1. Following Industry News
Stay informed about the latest trends and developments in automotive lighting by following industry news sources and publications.
23.2. Attending Automotive Events
Attend automotive events and trade shows to learn about new lighting technologies and products.
23.3. Consulting with Experts
Consult with automotive lighting experts to get advice and recommendations on the best lighting solutions for your vehicle.
24. License Plate Light Maintenance Checklist
Use this checklist to ensure that your license plate lights are properly maintained:
- [ ] Inspect lights regularly for dimming, flickering, or complete failure.
- [ ] Clean light covers regularly to remove dirt and grime.
- [ ] Check wiring connections for loose or corroded terminals.
- [ ] Replace bulbs as needed with the correct type and voltage.
- [ ] Protect lights from moisture and corrosion.
- [ ] Recycle old bulbs properly.
- [ ] Consult a professional if you suspect an electrical issue.
25. License Plate Light Laws and Regulations
Familiarize yourself with the laws and regulations regarding license plate lights in your jurisdiction.
25.1. Visibility Requirements
License plate lights must be visible from a certain distance, typically 50 feet, at night.
25.2. Color Requirements
License plate lights must emit a white light. It is illegal to use colored lights or to tint the license plate light covers.
25.3. Enforcement
Law enforcement officers may issue citations for vehicles with non-functional or improperly functioning license plate lights.
26. DIY vs. Professional Installation: Making the Right Choice
Deciding whether to replace your license plate lights yourself or hire a professional depends on your skills, experience, and comfort level.
26.1. Assessing Your Skills
Evaluate your skills and experience with automotive repairs. If you are comfortable working with electrical components and have the necessary tools, you may be able to perform the replacement yourself.
26.2. Considering the Complexity
Consider the complexity of the replacement process. If the process involves complex installations or modifications to the vehicle’s electrical system, it may be best to hire a professional.
26.3. Weighing the Costs
Weigh the costs of DIY replacement versus professional installation. DIY replacement can save you money on labor costs, but you will need to purchase the necessary tools and materials. Professional installation may be more expensive, but it can ensure that the job is done correctly and safely.
27. Utilizing Online Resources for Troubleshooting
The internet is a valuable resource for troubleshooting automotive problems, including license plate light issues.
27.1. Online Forums
Join online forums and communities dedicated to Mercedes-Benz vehicles. These forums can provide valuable information, tips, and advice from other owners and enthusiasts.
27.2. Video Tutorials
Watch video tutorials on YouTube and other video-sharing platforms. These tutorials can provide step-by-step instructions and visual aids for replacing your license plate lights.
27.3. Online Parts Catalogs
Use online parts catalogs to identify the correct replacement parts for your vehicle. These catalogs often provide detailed information and specifications for each part.
28. Common License Plate Light Problems in Mercedes-Benz Vehicles
Certain Mercedes-Benz models may be prone to specific license plate light problems.
28.1. Corrosion
Corrosion is a common problem in areas with harsh weather conditions. Protect the light units from moisture and corrosion by applying dielectric grease to the wiring connectors.
28.2. Wiring Issues
Wiring issues, such as loose or damaged wires, can cause the lights to malfunction. Inspect the wiring regularly and repair or replace any damaged wires.
28.3. Socket Problems
Socket problems, such as corroded or damaged sockets, can prevent the bulbs from making good contact. Clean or replace the sockets as needed.
29. License Plate Light Placement Regulations
Understand the regulations regarding license plate light placement to ensure compliance with local laws.
29.1. Height Requirements
License plate lights must be mounted at a certain height above the ground. Consult your local laws for specific height requirements.
29.2. Angle Requirements
License plate lights must be angled in such a way that they illuminate the license plate evenly and do not cause glare.
29.3. Number of Lights
Most jurisdictions require at least one license plate light, but some may require two. Check your local laws for specific requirements.
30. Maximizing Light Output with Proper Maintenance
Proper maintenance can help to maximize the light output of your license plate lights and improve visibility.
30.1. Cleaning Lenses
Clean the lenses regularly to remove dirt, grime, and debris that can reduce light output.
30.2. Polishing Lenses
Polish the lenses to remove scratches and cloudiness that can reduce light output.
30.3. Using High-Quality Bulbs
Use high-quality bulbs to ensure optimal light output and longevity.
31. How MERCEDES-DIAGNOSTIC-TOOL.EDU.VN Can Assist You
At MERCEDES-DIAGNOSTIC-TOOL.EDU.VN, we understand the importance of keeping your Mercedes-Benz in top condition. Replacing your license plate light bulbs or units is a simple yet crucial task that ensures your vehicle remains safe, compliant, and visually appealing.
31.1. Comprehensive Guides
Our website offers comprehensive guides and tutorials that walk you through every step of the replacement process. With clear instructions and detailed visuals, you can confidently tackle this task yourself.
31.2. Expert Support
Need help choosing the right replacement parts or troubleshooting an issue? Our team of experienced technicians is available to provide expert support and guidance. Contact us via WhatsApp at +1 (641) 206-8880 for personalized assistance.
31.3. Access to Quality Products
We provide recommendations for high-quality replacement bulbs and units that are specifically designed for Mercedes-Benz vehicles. Ensure optimal performance and longevity by choosing the right products.
31.4. Cost-Effective Solutions
By providing the knowledge and resources to perform this task yourself, MERCEDES-DIAGNOSTIC-TOOL.EDU.VN helps you save money on expensive dealership service costs.
32. Call to Action
Ready to replace your license plate light bulbs or units? Contact MERCEDES-DIAGNOSTIC-TOOL.EDU.VN today for expert guidance and support. Visit our website or reach out to us via WhatsApp at +1 (641) 206-8880 to get started. Ensure your Mercedes-Benz remains safe, compliant, and visually appealing with our comprehensive resources and personalized assistance.
By following these steps and utilizing the resources available at MERCEDES-DIAGNOSTIC-TOOL.EDU.VN, you can confidently replace your license plate light bulbs or units and keep your Mercedes-Benz in top condition.